Cotton Candy Ice Cream
|
Getting your Trinity Audio player ready...
|
I’ll never forget the summer my sisters and I turned our home kitchen into an ice cream laboratory. Emma brought her classic vanilla expertise, Olivia contributed her refined technique, and I showed up with cotton candy flavoring and a wild idea. My nephews were our eager taste-testers, and their eyes lit up when they tried my Cotton Candy Ice Cream for the first time.
The vibrant pink color, the nostalgic carnival flavor, and that creamy texture transported everyone straight to the county fair. Since then, this cotton candy ice cream recipe has become a family favorite, especially during birthday parties and summer celebrations. Today, I’m sharing this magical recipe with you because everyone deserves to experience the joy of homemade cotton candy ice cream that tastes like childhood memories wrapped in a cone.
Why You’ll Love This Cotton Candy Ice Cream Recipe
This cotton candy ice cream delivers pure nostalgia in every spoonful. First, it captures that signature carnival flavor without requiring an ice cream maker, though you can certainly use one if you have it. Additionally, the recipe comes together quickly with simple ingredients you can find at most grocery stores. Moreover, the gorgeous pink hue makes it perfect for themed parties, baby showers, or any celebration that needs a pop of color.
Furthermore, making cotton candy ice cream at home costs significantly less than premium store-bought versions. The flavor intensity is completely customizable, allowing you to adjust sweetness to your preference. Kids absolutely adore this treat, making it an instant hit at family gatherings.
Plus, you control every ingredient, avoiding unnecessary additives or preservatives. Finally, this recipe proves that restaurant-quality desserts are totally achievable in your own kitchen.
Ingredients You’ll Need
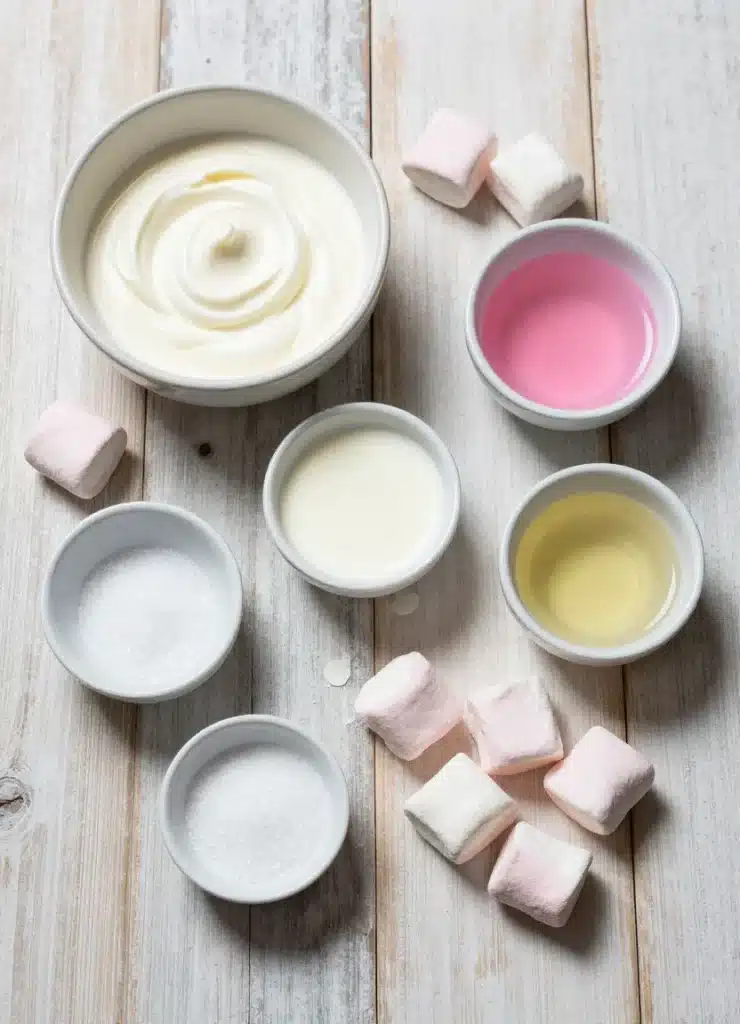
Creating perfect cotton candy ice cream requires just a handful of ingredients. I’ve tested this recipe countless times to ensure foolproof results every time.
| Ingredient | Quantity |
|---|---|
| Heavy whipping cream | 2 cups |
| Sweetened condensed milk | 14 ounces (1 can) |
| Cotton candy flavoring/extract | 2-3 teaspoons |
| Pink gel food coloring | 1/4 teaspoon (or to desired shade) |
| Vanilla extract | 1 teaspoon |
| Pinch of salt | 1/8 teaspoon |
| Optional: cotton candy pieces for mix-ins | 1/2 cup, torn into small pieces |
Quality matters tremendously when making cotton candy ice cream. I always choose full-fat heavy cream rather than light versions. The fat content directly impacts the creaminess and prevents icy crystals from forming. Similarly, genuine cotton candy extract creates more authentic flavor than artificial alternatives.
Substitutions & Variations
This cotton candy ice cream recipe welcomes creative modifications. If you cannot find cotton candy extract, try using cotton candy syrup instead, though you may need to reduce the condensed milk slightly. For a dairy-free version, substitute coconut cream for heavy cream and use sweetened condensed coconut milk.
Additionally, blue cotton candy ice cream looks stunning alongside the pink version. Simply swap pink food coloring for blue and adjust the flavoring accordingly. Some people prefer adding mini marshmallows or rainbow sprinkles for extra texture. I’ve also created a swirled version by dividing the base and coloring half pink and half blue before freezing.
For reduced sugar content, use sugar-free condensed milk alternatives. However, understand this affects both texture and freezing properties. You can also incorporate real cotton candy by folding small pieces into the mixture just before freezing. The cotton candy dissolves slightly, creating beautiful streaks throughout your cotton candy ice cream.
If you’re looking to elevate your cotton candy ice cream experience, consider trying a delicious twist with a creamy pasta dish. Check out this recipe for One-Pot Creamy Tortellini Alfredo that pairs wonderfully with sweet desserts.
Step-by-Step Instructions
Making this cotton candy ice cream couldn’t be simpler. I’ll walk you through my tested method that guarantees success.
Step 1: First, chill your mixing bowl and beaters in the freezer for at least 15 minutes. This crucial step helps the cream whip faster and achieve better volume.
Step 2: Pour the heavy whipping cream into your chilled bowl. Beat on medium-high speed until stiff peaks form, approximately 3-4 minutes. You’ll know it’s ready when the cream holds its shape and doesn’t slide when you tilt the bowl.
Step 3: In a separate bowl, combine the sweetened condensed milk, cotton candy extract, vanilla extract, and salt. Mix thoroughly until completely blended. Then, add your pink food coloring, starting with a small amount. Remember, you can always add more to deepen the color.
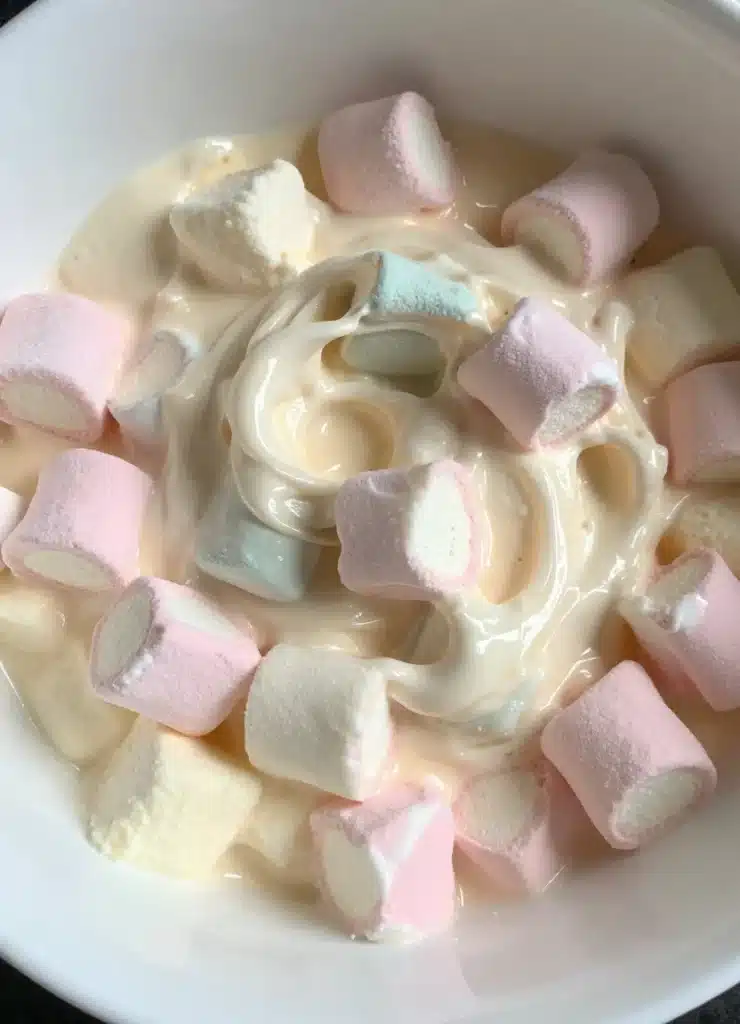
Step 4: Gently fold the condensed milk mixture into the whipped cream using a rubber spatula. Use a folding motion rather than stirring to preserve the airiness. This technique keeps your cotton candy ice cream light and fluffy rather than dense.
Step 5: If adding cotton candy pieces, fold them in now. Work quickly because they dissolve when exposed to moisture.
Step 6: Transfer the mixture into a freezer-safe container. I prefer a 9×5 inch loaf pan lined with parchment paper for easy removal. Smooth the top with a spatula.
Step 7: Cover tightly with plastic wrap, pressing it directly onto the surface to prevent ice crystals. Freeze for at least 6 hours or overnight until completely firm.
Pro Tips for Success
After making cotton candy ice cream dozens of times, I’ve learned several tricks that elevate results dramatically. First, don’t skip chilling your bowl and beaters. This seemingly small step makes whipping cream significantly easier and faster.
Moreover, use gel food coloring rather than liquid versions. Gel colorings provide more vibrant hues without adding extra moisture that could create ice crystals. Additionally, taste your mixture before freezing. The flavor should be slightly sweeter and more intense than you want in the final product because freezing dulls sweetness.
Furthermore, avoid over-mixing when folding ingredients together. Excessive mixing deflates the whipped cream, resulting in dense, icy cotton candy ice cream. Instead, stop folding as soon as you no longer see white streaks.
Also, let your cotton candy ice cream sit at room temperature for 5-10 minutes before scooping. This softens it just enough for smooth, perfect scoops. Finally, store it in an airtight container with parchment paper pressed against the surface to maintain freshness and prevent freezer burn.
To enhance your ice cream-making skills, it’s essential to master a few key techniques. For a refreshing side dish that complements your sweet treats, try this Creamy Cucumber Salad Recipe that balances flavors perfectly.
Storage & Reheating Tips
Proper storage keeps your cotton candy ice cream tasting fresh for weeks. Store it in an airtight, freezer-safe container for up to 2 months. I always press parchment paper or plastic wrap directly onto the surface before sealing the lid. This prevents ice crystals from forming and maintains that smooth, creamy texture.
Interestingly, homemade cotton candy ice cream freezes harder than store-bought versions because it lacks commercial stabilizers. Therefore, remove it from the freezer 10 minutes before serving. This brief tempering period makes scooping infinitely easier.
Avoid repeatedly thawing and refreezing, as this degrades texture and creates unwanted ice crystals. Instead, scoop only what you need and immediately return the container to the freezer. Additionally, store your cotton candy ice cream away from foods with strong odors, as ice cream readily absorbs surrounding flavors.
What to Serve With This Recipe

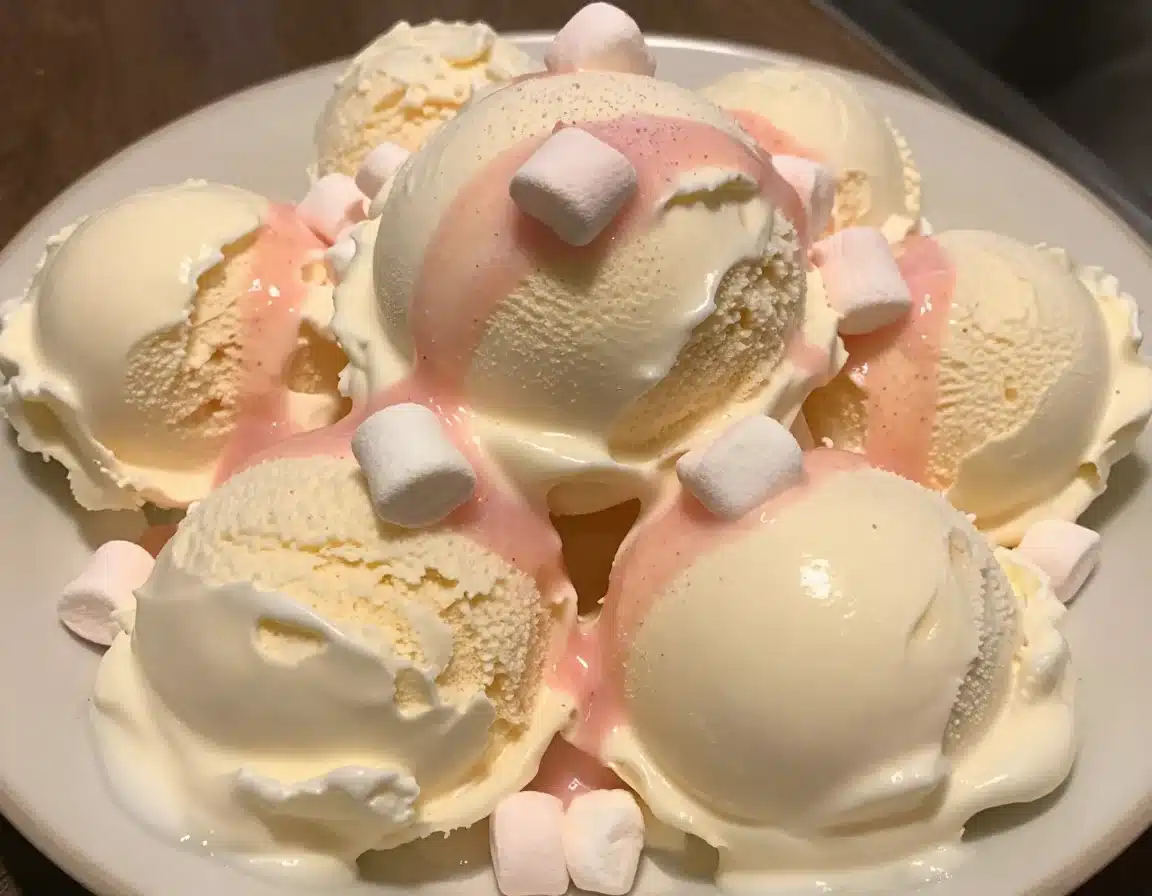
This cotton candy ice cream shines in numerous serving contexts. Naturally, it’s perfect in sugar cones or waffle bowls for a classic presentation. However, I love getting creative with pairings that complement the nostalgic carnival flavor.
Try serving your cotton candy ice cream alongside warm funnel cake for an ultimate fairground experience. Alternatively, make ice cream sandwiches using soft sugar cookies or chocolate chip cookies. The contrast between warm cookies and cold ice cream creates an irresistible textural experience.
Additionally, this ice cream works beautifully in milkshakes. Blend it with milk and top with whipped cream and cotton candy garnish. For birthday parties, create an ice cream bar with various toppings like rainbow sprinkles, crushed cookies, chocolate chips, and mini marshmallows.
Furthermore, pair cotton candy ice cream with fresh berries for a lighter finish. The fruit’s natural tartness balances the sweet, nostalgic flavor perfectly. I’ve also served it with warm brownies for an indulgent dessert that guests absolutely rave about.
Serving cotton candy ice cream can be a fun and creative endeavor. For a hearty meal that pairs well with your dessert, consider making Steak and Fries for a complete dining experience.
FAQs
Can I make cotton candy ice cream without an ice cream maker?
Absolutely! This cotton candy ice cream recipe specifically uses the no-churn method, requiring zero special equipment. You only need mixing bowls, a hand mixer or whisk, and a freezer-safe container. The whipped cream base creates a naturally creamy texture without churning.
Where can I buy cotton candy flavoring?
Cotton candy extract is available at most craft stores in the baking section, major grocery stores, and online retailers like Amazon. Brands like LorAnn and Watkins produce reliable cotton candy flavorings. Alternatively, check specialty baking supply stores for concentrated versions.
Why is my cotton candy ice cream icy instead of creamy?
Icy texture typically results from insufficient fat content or over-mixing. Always use full-fat heavy cream and fold ingredients gently to preserve air. Additionally, ensure your freezer maintains proper temperature (0°F or below) and store the cotton candy ice cream in an airtight container with minimal air exposure.
Can I use real cotton candy in the recipe?
Yes! You can add small pieces of actual cotton candy to your cotton candy ice cream. However, fold them in immediately before freezing because they dissolve quickly when exposed to moisture. They create beautiful pink swirls and intensify the carnival flavor.
How long does homemade cotton candy ice cream last?
Properly stored cotton candy ice cream maintains optimal quality for up to 2 months in the freezer. However, it tastes best within the first month. Always store it in an airtight container with parchment paper pressed against the surface to prevent freezer burn and ice crystal formation.
Cotton candy ice cream is a delightful dessert that combines the nostalgic flavor of cotton candy with the creamy texture of ice cream. This unique treat is often enjoyed at fairs and parties, making it a popular choice for those seeking a taste of childhood memories, as seen in this Ice Cream overview.
Nutrition Information (Per Serving)
Based on 8 servings per recipe:
| Nutrient | Amount |
|---|---|
| Calories | 310 |
| Total Fat | 22g |
| Saturated Fat | 14g |
| Cholesterol | 75mg |
| Sodium | 85mg |
| Total Carbohydrates | 25g |
| Sugars | 24g |
| Protein | 4g |
This cotton candy ice cream brings pure joy to any occasion. The whimsical flavor, gorgeous color, and creamy texture make it unforgettable. Whether you’re recreating childhood memories or creating new ones, this recipe delivers consistent, spectacular results. Give it a try, and watch as everyone’s face lights up with that first taste of homemade cotton candy ice cream!
Cotton Candy Ice Cream
Ingredients
Method
- Chill your mixing bowl and beaters in the freezer for at least 15 minutes.
- Pour the heavy whipping cream into your chilled bowl and beat on medium-high speed until stiff peaks form, about 3-4 minutes.
- In a separate bowl, combine the sweetened condensed milk, cotton candy extract, vanilla extract, and salt. Mix thoroughly and add pink food coloring to desired shade.
- Gently fold the condensed milk mixture into the whipped cream using a rubber spatula.
- If adding cotton candy pieces, fold them in now.
- Transfer the mixture into a freezer-safe container and smooth the top.
- Cover tightly with plastic wrap and freeze for at least 6 hours or overnight.
Notes
Or browse by category:
As an Amazon Associate I earn from qualifying purchases.